Monday, November 29, 2010

Sweet Little Headband Giveaway!!

Welcome to our 

FIRST GIVEAWAY EVER!!

Yes...if you score this giveaway, you can officially say that "I was the FIRST winner on an obscure blog written by goodness knows who". I know, I know, those are SOME bragging rights. Don't go entering all at once now... 


WHAT will you win you ask? Well, I'm so glad you did, because this week's giveaway was the very headband featured on U-Create last week. 


My friend, you will have a chance to win this lovely, unique, spectacular


Sweet Little Flower Headband


made with my own two crocheting hands. 


(**Disclaimer: The giveaway is just for the headband...not my hands...those are still very much attached to my arms)


Okay, okay, now we get to the part that you are dying to know (maybe not dying, but at least running a fever...). 

How to Enter??

Well amigo, there are a 4 different ways to enter, depending on what you fancy....


Follow my blog (and tell me in a comment...)
Blog about this giveaway (and leave a link to the post in the comments)
Leave a Comment...and tell me anything...your favorite color, your grocery list, your dog's name...Okay, maybe not your dog's name. 
Facebook or Twitter the giveaway (and tell me in a comment)

That's it! you have 4 entries total. And with only 32 followers on this obscure blog, I'd say your odds are pretty good....

Giveaway ends Friday December 3rd, 2010! Winner will be chosen using my great grand-dad's dead dog's bones random.org. 
Don't forget to leave a way to contact you so you can claim your prize!!

Cheers!

Now you too can trace your Nativity!

Oooooo Baby, I'm feeling technological today! Today marks the second time I've used a scanner in my life. AND I even took it a step further... Scary right? I turned Word Documents into PDFs realized that PDFs aren't an acceptable file in Blogger, and saved it the smart way without any help from my husband. Save your applause (or don't...it's really up to you). 


You want proof that I've advanced in the computer world? Well, here you go; the unveiled masterpieces for your tracing and painting pleasure....


Directions
1. Right Click - Copy
2. Paste into Microsoft Word
3. Change the Margins to as small as they go
4. Enlarge the picture as large as it will go
5. Print and trace :)


My husband's boss was asking me about uploading the Nativity JPGs this morning, and I figured, you gotta please the boss, so M, these are for you! I hope you consider this during our next campaign check in meeting...or not...

Friday, November 26, 2010

Christmas Silhouette Tutorial

***This tutorial is based on a tutorial done by The Pink Peony of Jardin for Halloween. It was so cute that I just had to do one for Christmas. PLUS, I already had the frames, and there is nothing my husband loves to hear more than "Free"

Christmas Silhouette Tutorial


Difficulty: Easy
Time: 1 hour
Cost: $3 max
Fun-ness: You're going to have a hernia...

Step 1: Find and Print
Print off chosen images in Black and White. I chose a nativity scene, and found/combined images off Google. As you can see, my printer is COMPLETELY out of Black ink, but it didn't really matter in the end. 


Step 2: Trace
Place a piece of heavy weight card stock on top of the printed images. Lightly tape together, and tape to a window. Lightly trace the outline of the images onto the card stock using a pencil. Also remember, if there is something you don't like, or something you want to add in, DO IT! It's your painting, so do what you want :)

Problem - No Stable.......... Solution - Add one!

Step 3: Paint
Grab some black paints and an assortment of paintbrushes (depending on how detailed your picture is). Carefully paint the insides of your tracing, working from the inside out. Make sure to dip your brush in paint often, because it helps keep your lines smooth. 


Step 4: Frame
The thing I love the most about this project is that it is super cheap. You can find black document frames at the Dollar Store for...Yep, you guessed it, $1.


And that's it! You're done! Easy, fun, and the end product looks oh so good! 

*** Want the PDFs? Check out this Post**

Black Friday Miracles Do Happen!

Black Friday = My favorite consumer Holiday of the year. And I must say that this year took the cake. I was somehow able to convince my brother, sister-in-law, and my husband to wake up at 3:30am to stake out and tag-team the Joann Fabrics Black Friday Flannel sale. I know! Black Friday Miracle!!

I was so excited about the sale, I even dreamed about it...more than once. The game plan was to get in and get out with as many awesome fabrics as we could. My brother got the "cutting ticket", my husband manned the basket, and my sister-in-law and I were in charge of scavenging for fabric. 

The plan was executed perfectly, and being the first people in the store, we even got free scissors (x4)! Total Savings? $180! I was able to get $240 worth of fabric for 60 buckeroos!

Okay, okay, I know I am lame, but here are some of the great fabrics I got thanks to my amazing family!!


The only thing that I didn't really think about until I got home was the fact that I mainly chose girly fabric....hmmm....I sure hope boys like flowers too...

Tuesday, November 23, 2010

Sweet Little Headband Tutorial!

Last night, I was dinking around on etsy, and I discovered this adorable headband pattern. I was SO tempted to buy it, until I realized, "HEY! I can figure it out myself!" After realizing how easy it was, I've decided to share it with you! In my very first tutorial:

The Sweet Little Headband

Difficulty: Easy
Time: 30minutes - an hour
Fun-ness: Fun-o-rama

Materials:

* Size J crochet hook
* 100% cotton Yarn (I used Sugar and Cream Brand)
* 1/2 inch wide ribbon
*Glue Gun (or equally strong adhesive
* Sewing Needle and thread
* Yarn needle


Directions:
Part 1: The headband!!

Step 1: Making your strand
Take your yarn and crochet hook and chain 175 (150 for a smaller head) stitches. Make sure to leave a 8 inch yarn tail on each side of the chain to help in sewing it together later. This chain will serve as all three strands of your band. Tie off and fold the strand into thirds.


Step 2: Creating 3 bands
Squeeze the three pieces together at one end, and using the yarn tail, sew the 3 pieces of the band together. You will be using a yarn needle for this step. After the ends are tight and secure, tie off, and cut off any excess yarn. Repeat on the opposite side.


Step 3: Prep the Ribbons
Cut two 15 inch pieces of coordinating ribbon. To keep from fraying, slightly melt one side's edge using the stove top burner (if you do both sides, it makes it hard to attach to the band later). Repeat on the second piece of ribbon.


Step 4: Attaching the Ribbons
Taking your un-melted ribbon side, fold over a 1/8 inch seam and hotglue it down (or sew...whatever you prefer). This will create a finished look on your edge. Taking your crocheted band and wrap the ribbon width wise around the band and hot glue it down (once again, if you prefer to sew, be my guest...I'm just more of the "get it done quick" type). Repeat this process with the second ribbon. 

Step 5: Creating a finished and secure look
In order to create a finished look, cut two 2 inch pieces or ribbon. Fold over both ends, and create an 1/8 inch seam using my favorite tool...the hot glue gun. Next, fold the entire ribbon in half...hot dog style...and glue it in place. Last, wrap it around your already attached ribbon, gluing it down as you go, to create a "cap" look. This will also help to further secure the ribbon to your band. Repeat this process on the other side as well 

Part 2: The Flower!
**The following instructions are based on the assumption that you already know the basics of crocheting. If you are trying it for the first time, here is a good video to help you with the basics as you follow the tutorial. 

ch: Chain
sk st: Skip Stitch
sl st: Slip Stitch
sc: Single Crochet
hdc: Half Double Crochet
dc: Double Crochet

Step 1: Creating a Base
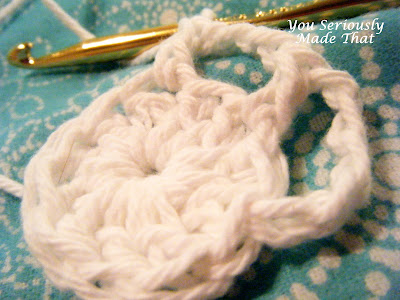
To start off, you will need to ch 4, and sl st into the first worked ch in order to create a small circle. 
Ch 2 (this will serve as your first dc), and then dc 11 times into the center of the small circle. Sl st to finish the base off. 

Step 2: Creating Flower Petal Base
Ch 5, sk st, and dc into the next stitch. This will create a loop to crochet your petals onto. Ch 3, sk st, and dc into the next stitch. Continue until you have a total 5 loops and 3 chains. To end, sl st to the first worked chain.


Step 3: Creating the First Round of Petals
Into the first loop, complete the following stitches: 
sc, hdc, 4 dc, hdc, sc 
This will create one petal. Repeat these stitches on the remaining 5 loops. 


Step 4: Creating a Second Round Base
Sl St down to the bottom circle, right between 2 of the dc (from step 2). ch 4, sk st, and dc into the next ch st. This will create a loop for your second round of petals. ch 2, sk st, dc into next ch st. Continue until you have a total of 5 loops and 2 chains. sl st into the first worked chain to create 6 loops total


Step 5: Creating Second Round Petals

Into the first loop, complete the following stitches: 
sc, hdc, 2 dc, hdc, sc 
This will create one petal. Repeat these stitches on the remaining 5 loops. Tie off to finish. (Work the yarn tail into the flower using a yarn needle)


Step 6: Finishing it all off
Close up the flower's center using the yarn tail closest to the center. String on a yarn needle, and pull the yarn around the entire circumference of the opening. Pull tight to close. Tie off, and cut the remaining tail. 

At this point, you have two options, You can hot glue the flower onto an alligator clip so that you can take the flower on and off the headband. Your second option is to hot glue or sew the flower onto the headband (I chose this option, and it is pictured below). You can do whatever you fancy...


And there you go...you're done!! 

Now you can enjoy your hard work, and every time someone asks "Where did you get that cute headband" you can proudly say "I made it!"